
Kefir is a cultured, fermented drink usually made from milk and tastes like plain yogurt. It can be made from non-dairy beverages such as coconut milk, almond milk and even water. However, according to Healthline, since kefir is fermented those who are lactose intolerant can drink kefir without a problem.
Fun fact: there are more probiotics in 1 tablespoon of kefir than there are in 1 cup of yogurt. Most yogurts have 3-5 different strains. Kefir has around 20 different strains of beneficial bacteria thus is better for gut health.
Here are just a few probiotic strains found in kefir:
- Lactobacillus acidophilus
- Bifidobacterium bifidum
- Streptococcus thermophilus
- Lactobacillus delbrueckii subsp bulgaricus
- Lactobacillus lactis
- Lactobacillus kefiranofaciens
- Lactobacillus helveticus
- And other Leuconostoc species
If you’re unfamiliar with all the amazing benefits of kefir such as fighting osteoporosis, boosting immunity & it’s cancer fighting properties you can read more here.
How to Make Homemade Probiotic Rich Kefir
What You’ll Need
- A mason jar
- Cloth, cheesecloth or coffee filter
- Rubber band
- Milk of choice (not nut milk for this recipe)
- Kefir grains these aren’t actually grain, the name comes from their appearance & texture. Just like with sourdough, “starters” are given away because they reproduce. Ask your local health food store if they know of someone to get kefir grains from or you can purchase them online here.
- A mesh strainer or cheesecloth
- Time (24-48 hours)

Instructions
- Using a clean mason jar, fill the jar with approximately 1 cup milk to 1 TBS kefir grains. Pour the milk in 1st then add the kefir grains. The grains will slowly fall to the bottom of the jar. Be sure not to fill the glass all the way to the top. Leave an inch or so of space from the rim
- Cover the jar with a cloth, cheesecloth or coffee filter, using the rubber band to hold the cloth or filter in place
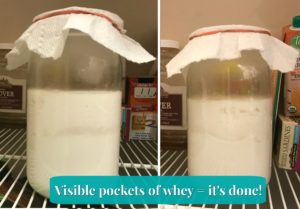
- Leave at room temperature for 24-48 hours. On a counter or in the pantry where it won’t in the way or thrown in the trash. This is when the milk will ferment and turn to kefir. This process is called “ripening”. You’ll know the kefir is ready when it starts to separate a bit. You will see small pockets of pale yellow liquid – the whey
- Strain the kefir in the strainer into a clean container or jar separating the kefir grains from the liquid kefir
- Rinse the fermenting jar and start a new batch repeating the whole process. If you do not want to make a new batch simply put the kefir grains into a baggie with just enough new milk to cover the grains. This keeps them “alive” and ready to grow for the next batch. Keep refrigerated.
Storing Kefir
- Store kefir in an airtight container – such as a mason jar with matching lid. Keep refrigerated.
- The newest studies have shown that with quality ingredients and sterile utensils kefir can stay good up to 10 months.
- NOTE: kefir is ready to consume right away however, leaving the finished product in the refrigerator 1-2 days actually increases nutritional value (increases B vitamins and folate!) plus, improves flavor due to biosynthesis of yeasts of kefir grain organisms.
Now What?
My absolute favorite way to use kefir is in my daily smoothie. Whatever your smoothie blend is, add 1-2 TBS or to taste.

If you’re new to eating kefir the taste can take a little to get used to. As you surf the internet you will find lots of information on how to make kefir and the methods can vary. This has been the easiest way I have found to make kefir and reap the benefits! If you’re wondering what else to do with all that kefir, here are some out of the ordinary ideas to add it to every day meals.
References:
- https://www.mayoclinic.org/healthy-lifestyle/consumer-health/expert-answers/probiotics/faq-20058065
- De Oliveira Leite AM, Miguel MA, Peixoto RS, Rosado AS, Silva JT, Paschoalin VM (October 2013). “Microbiological, technological and therapeutic properties of kefir: a natural probiotic beverage”. Braz J Microbiol. 44 (2): 341–9. doi:10.1590/S1517-83822013000200001. PMC 3833126
 . PMID 24294220.
 - Guzel-Seydim ZB, Kok-Tas T, Greene AK, Seydim AC (March 2011). “Review: functional properties of kefir”. Crit Rev Food Sci Nutr. 51 (3): 261–8. doi:10.1080/10408390903579029. PMID 21390946.
- Farnworth, Edward R (4 April 2005). “Kefir-a complex probiotic” (PDF). Food Science and Technology Bulletin: Functional Foods. 2 (1): 1–17. doi:10.1616/1476-2137.13938. Archived from the original (PDF) on 14 May 2014. Retrieved 20 December 2014.
- Making Traditional Kefir from Dom’s